Getting Started
luckycloud Mail in the Webmail Interface
luckycloud Mail is the streamlined frontend of our mail service. Logging into the Web-IMAP client is simple with your email address and password at https://mail.luckycloud.de. You can now send and receive emails.

Alternatively, you can log into your customer dashboard via our website as usual. From there, you can access the luckycloud Webmail interface via the "Mail" tab (top right).
How do I add a mail account in the webmailer?
- Log into the webmailer.
- To add another mail account, click on your user management in the top right.

- Under "Add Account", enter the email address and corresponding password of the email account.

- Finally, click on "Add".
How do I add a filter or rule in the webmailer?
- Log into the webmailer.
- To add a filter or rule, click on the "gear icon" at the bottom left to access the settings.
- Select "Filters" and "Add Filter" from the menu on the left.
- You can now create a new filter.

- Define your personal rules for incoming mails by selecting an action and optionally adding a condition.
- Click on "Done" at the end.
- To apply the filter, click on "Save" in settings.
Setting up forwarding
- Log into the webmailer.
- To set up forwarding, click on the "gear icon" at the bottom left to access the settings.
- Select "Filters" and "Add Filter" from the menu on the left.
- You can now select "Forward to" from the "Actions" drop-down menu.

- Enter the corresponding email address to which you want to forward the account's emails.
- If you only want to forward certain emails, add one or more conditions by clicking on "Add Condition".
- For example, if you want to forward all emails with the subject "Invoice", set the following under conditions:
| Option | Input |
|---|---|
| From | Subject |
| Contains | |
| Input Field | Invoice |
- Then click on "Done".
- To apply the filter, you just need to "Save" the settings.
Setting up a vacation notification
- Log into the webmailer.
- To set up a vacation notification, click on the "gear icon" at the bottom left to access the settings.
- Select "Filters" and "Add Filter" from the menu on the left.
- You can now select "Vacation Notification" from the "Actions" drop-down menu.

- Enter a message that all recipients will automatically receive when they email you. An example: "I am currently on vacation. I will be available for you again next week."
- Optionally, you can enter a subject for your out-of-office notice.
- Then click on "Done".
- To apply the filter, click on "Save" in settings.
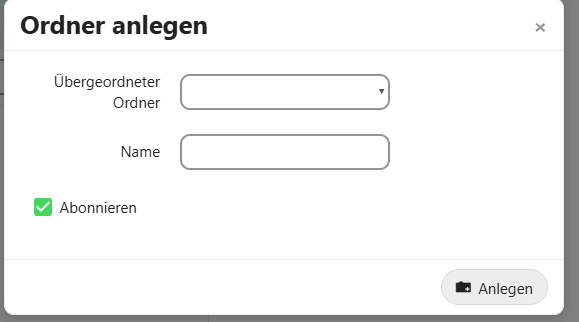
How do I create a subfolder in the webmailer?
- Log into the webmailer.
- To create a new folder for specific emails, click on the "Create Folder" icon at the bottom left.
- Name the folder and optionally select a parent folder.

- Confirm the setting with "Create".
Where can I make security adjustments in the webmailer?
- Log into the webmailer.
- To adjust your security settings, click on the "gear icon" at the bottom left to access the settings.
- Under "Security", you can set how many minutes should pass before an automatic logout occurs. You can also set up two-factor authentication for your login process here.
How do I create a signature in the webmailer?
- Log into the webmailer.
- To set a signature for a specific email account, click on the "gear icon" at the bottom left to access the settings.
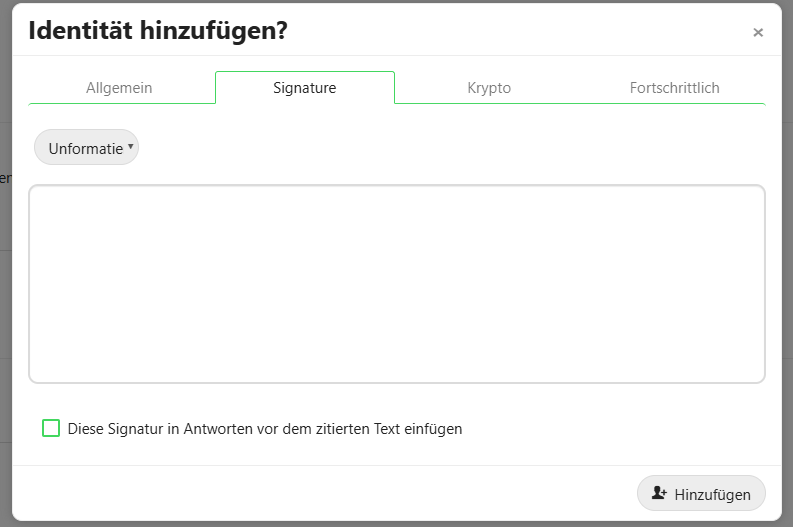
- Under "Accounts", you can create a signature for an existing email address by selecting "Add Identity".
- Enter the following data under the "General" tab:
- Set a name for the signature under Label.
- Write the email address you want to add to the signature in the "Email" field.
- Enter the name you want to be displayed to the recipient under "Name".
- Set a name for the signature under Label.

- Now go to the "Signature" tab and enter the desired signature in the text field.

- Complete the process with "Add".
What is an alias?
An alias is an additional email address. With an alias, you can send emails as usual while hiding your real email address. Here's how it works: The recipient only sees your alias address. The alias emails are displayed in your real inbox. The purpose of an alias email address is to protect your identity, for example, if you want to participate in a contest but don't want to be flooded with spam emails in the future. You can delete your alias email address at any time if you no longer need it.
How do I create an alias email address?
You can easily create an alias email address via your customer dashboard.
- Log into your customer dashboard on our website.
- Scroll down to the "luckycloud Mail" tab and click on it.

- Here you can see all active email addresses. To add an alias, click on the green "Add Email Address" button.
- A new window will open where you can add a new email address. Open the drop-down menu under "Type" and select the "Alias" option.

- Click on "Save" and you can start using your alias email address.
Note: If you want to use multiple aliases, you need to configure this in your luckycloud account accordingly. Log into your customer dashboard and go to "Manage & Pay". Under "luckycloud Mail", you can set the number of aliases using the slider.