Collaboration in Teams
Data Sharing and User Permissions in luckycloud
With luckycloud, you can quickly, easily, and securely share data with colleagues, business partners, family, and friends. There are four ways to do this, which we will explain to you step by step here. Our video tutorial provides an initial overview:
Also, check out the “luckycloud Tutorial: Create, Secure, and Share Directories”.
(1) Sharing via "Share & Upload"
The easiest way to share files with external users is the "Share & Upload" function. This allows you to provide data for both uploading and downloading. You also have the option to protect the share link with a password and set an expiration date.
Here's how it works:
- Log in to your customer dashboard via the luckycloud website. Users of luckycloud Enterprise log in via their created cloud domain. Now click on "Cloud Storage" at the top right.
- Hover over a directory, folder, or file and click on the share icon.

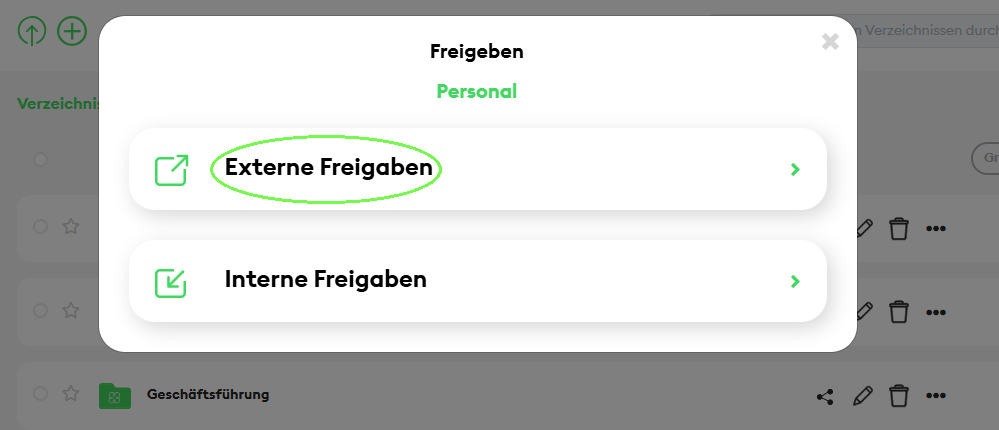
- A pop-up window opens where you can share the selected item with external or internal users. Note: In our example, we are sharing the data with external users.

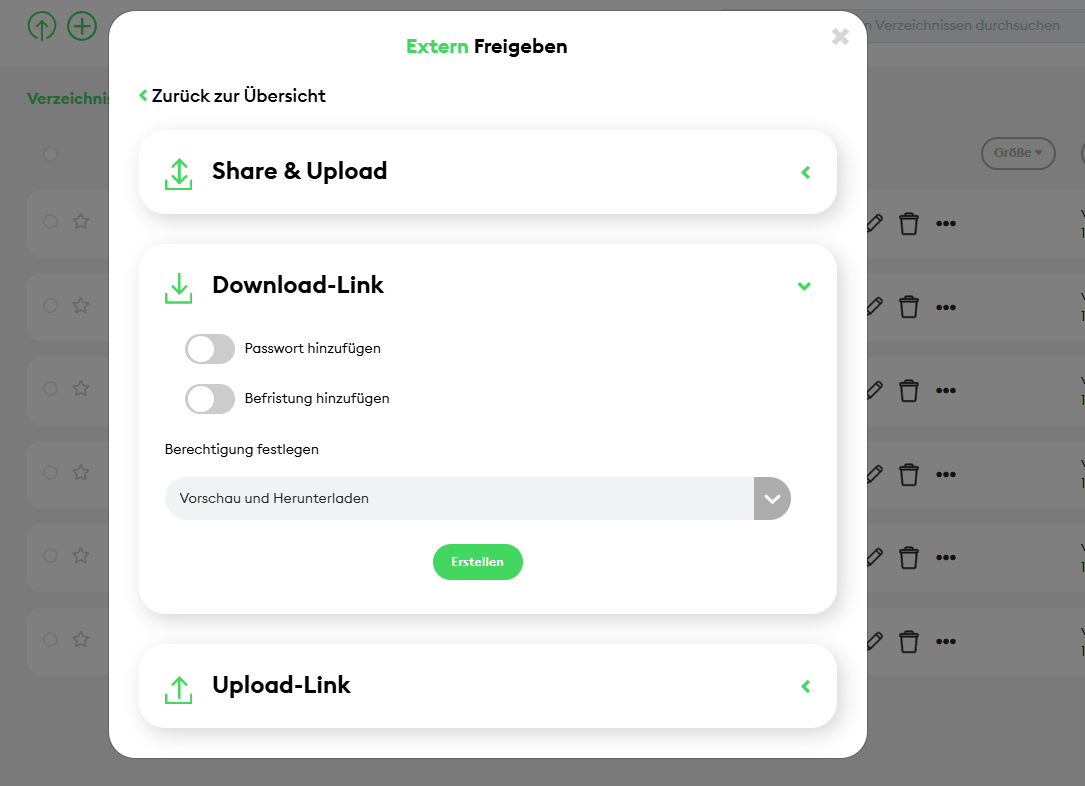
- Click on "Share & Upload" to provide data for uploading and downloading. You can optionally protect the link with a password or set an expiration date.

- When you click "Create," a link is generated. You can copy this link and send it, for example, via your email program. Alternatively, you can send the link directly via luckycloud. Click on "Send," enter the recipient's email address, and optionally a message. With "Save," the download link is sent to the specified person.
(2) Sharing via Share & Upload, Down- or Upload-Links
The share links are very suitable for sharing data with external people who do not have a luckycloud account. With a download link, you can share documents, while the upload link allows external users to upload files. There is also a "Share & Upload" link that allows both uploads and downloads.
You can create external links for entire directories, folders, or individual files:
- Log in to your customer dashboard via the luckycloud website. Users of luckycloud Enterprise log in via their created cloud domain. Now click on "Cloud Storage" at the top right.

- Hover over the respective directory, folder, or file and click on the share icon.

Note: The creation of down- or upload links is only possible for unencrypted directories.
- A pop-up window opens, and you have the option to share the selected item with external or internal users. Note: In our example, we want to share data with external users.

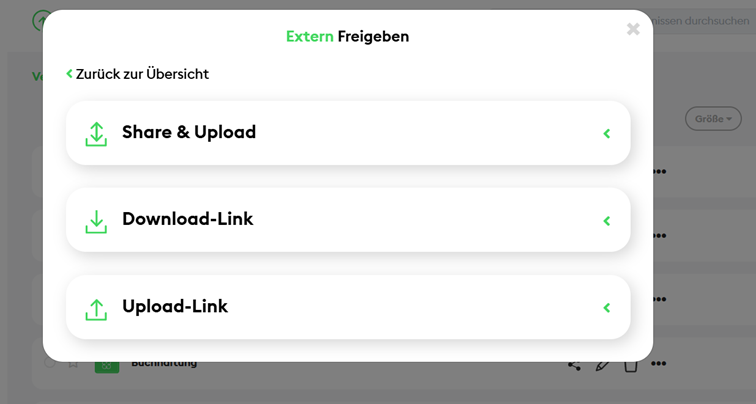
- Now choose which type of share links you want to create. You have three options:

-
Click on "Download Link" if you want to provide data for download. You can optionally protect it with a password or set an expiration date. Additionally, you can choose whether to generate a one-time code. To do this, activate the corresponding toggle and enter the recipient’s email address or multiple email addresses (separated by commas) in the text field.
-
When sharing files, such as Word documents, you can also define different permissions:
-
Clicking "Create" generates a link that you can copy and send via your email program.
-
Alternatively, you can send the link directly via luckycloud. Click on "Send" and enter the recipient’s email address. Optionally, you can add a message for the recipient.
-
If you previously selected "Enable One-Time Code", you can review and edit the recipient email addresses before sending.
- Clicking "Send" again will send the download link to the specified person.
- If you used the "Enable One-Time Code" option, recipients will be asked to confirm their email address and "Retrieve Code" after clicking the link.
- Recipients will receive the code within a few seconds via email after clicking "Retrieve Code" and can then enter it. It remains valid for one hour. If needed, they can generate a new code.
- Once the code is entered and "Save" is clicked, recipients will be directed to the file download for their shared files.
The process for Share & Upload Links and Upload Links follows the same steps.
Upload Links with Mandatory Name Entry
If you choose to share via "Upload Link", you also have the option to require recipients to enter their name before uploading their files. This allows you to track which recipient uploaded which files.
To tailor the name entry feature to your needs, we offer two configuration options:
Option 1: Create a Folder with the Recipient’s Name
If you activate this toggle and click "Create", luckycloud will generate a subfolder named after the recipient.
Once the link is created, you can copy and send it manually or send it via luckycloud to the intended recipients. In the latter case, recipients will receive an email from luckycloud notifying them that an upload link has been shared with them.
Clicking the link allows the recipient to enter their name and upload the desired files via drag & drop.
As a luckycloud user, you will now see a subfolder named after the recipient inside the designated folder.
Clicking on the subfolder allows you to view the files uploaded by that recipient.
Option 2: Append the Recipient’s Name to the Filename
If you activate this toggle and click "Create", luckycloud will append the entered name to the filename.
Once the link is created, you can copy and send it manually or send it via luckycloud to the intended recipients. In the latter case, recipients will receive an email from luckycloud notifying them that an upload link has been shared with them.
Clicking the link allows the recipient to enter their name and upload the desired files via drag & drop.
As a luckycloud user, the uploaded file will now appear with the recipient’s name appended to the filename.
In the "Activities" section of luckycloud, you can track exactly when each recipient uploaded which files.
(4) Group Shares
The shares for previously created groups work just like user shares. Simply click on "Share for Group" and enter the group name in the designated field.
How do I create a group?
You can create groups in a few steps in the web interface.
-
Log in via our website.
-
Once in the customer dashboard, navigate to "Cloud Storage" at the top right.
-
Then go to "For My Groups" and click on the green plus symbol at the top left.

-
A pop-up window will open where you can enter a group name.

-
Click on "Submit" and the new group will be created.
-
To add members, go to the plus symbol at the top left next to the group name.
-
You can now add users to the group via their email address. Enter the full email address of the new member.

Working on a File with Multiple People Simultaneously
Once you have shared a directory with your colleagues and synchronized it on the computer, all users can add, change, or delete files in the directory. Every change is automatically synchronized on the other users' computers. In the online office editor, you can work on a document with multiple people simultaneously.
- Depending on which luckycloud service you use, log in to one of the following options:
a. One/Teams: sync.luckycloud.de or directly via our website
b. Business: storage.luckycloud
c. Enterprise (Plus): your created cloud domain - Navigate to the corresponding file and open it by clicking on the office file.
- If you have finished your changes, close the document.
All users can proceed in the same way. This way, everyone can follow the changes live.
Note: The changes are only saved when the last person leaves the document.
Conflict Files
Sometimes, other users and you may edit the same file locally at the same time – your changes may conflict with others' changes. In this case, your change is saved, while the changes of other users are saved as conflict files. These files end with the author's email address and the current time – e.g., test.txt (name@example.com2024-01-01-00-12-24). This way, no changes are lost, and you have the opportunity to manually review and adjust the changes.
Locking Files
Note: This feature is only available for luckycloud Business and luckycloud Enterprise Plus!
If you want to avoid such a conflict from the start, you can also lock the file. Other users cannot edit the file until it is released by you again. This already happens automatically in the background with new versions. Here's how you can proceed manually:
Lock files locally using the luckycloud client:
Note: If you open a file locally with Word, a so-called lock file is created that locks the document. This lock file must be constantly synchronized, which brings susceptibility to errors. In case of problems or if a file is not synchronized correctly, it could be due to a remaining lock file.
Lock files in the web browser (only for luckycloud Business and luckycloud Enterprise (Plus)):
Unlocking Files
If you want to unlock a file, you must proceed just like when locking a file. However, in the last step in the drop-down menu, the option "Unlock" will appear. Click on it, and the file is unlocked again.
Note: If you have not released the file again after six hours, this happens automatically.